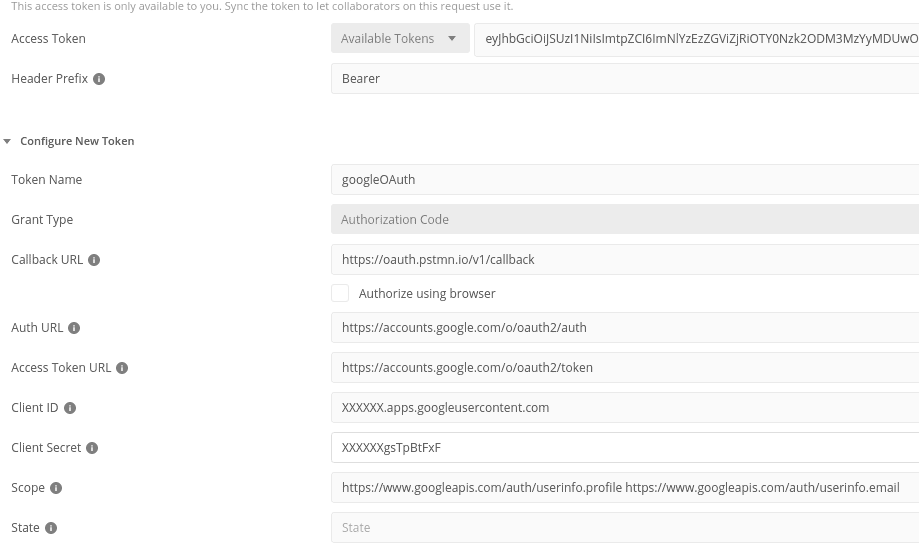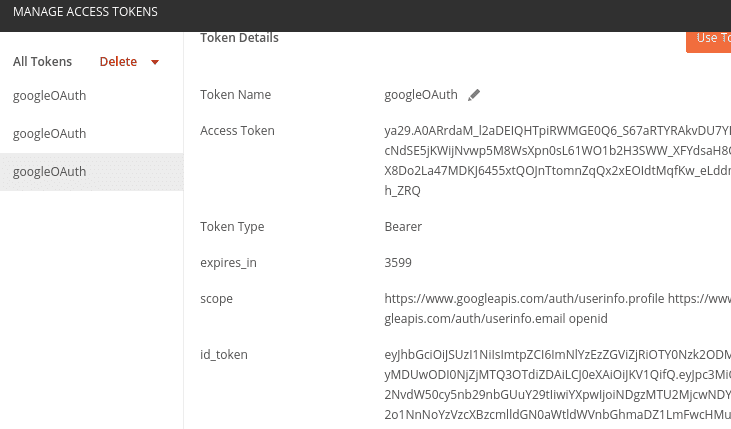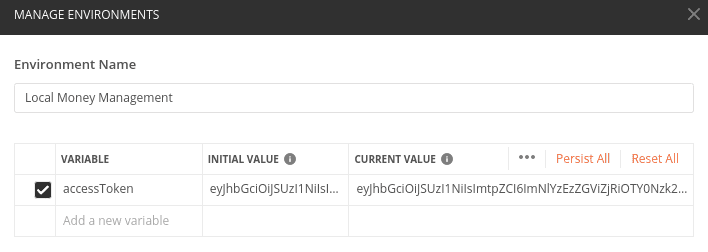
In the last couple of articles, we have introduced OAuth with Google, and users in general. This is all great, but the testing side of it has been left a little behind. The reason for this is that I wanted to dedicate an entire article on how to do automated testing with OAuth authentication with Postman. Our previous suite has suffered a great deal and is now no longer working.
In this article, I will cover how to add the OAuth token into the Postman suite. Next, I will cover why this is in my opinion not a good idea to do actually, and cover how I will replace it with mocking the actual verifier.
OAuth in Postman
We have introduced OAuth in our small succession of posts, starting here. Pretty much since then, our tests have been broken. Next, we have changed the processing of accounts, in that they now belong to logged-in users, and that has made the tests even more useless. Now we will fix all that.
The tricky part here is that, in our automated suite, we have an in-memory database that’s spun up in the docker container itself. So, adding some users, as we may in a test environment, is not an option. What is an option however, is to create one using the dedicated endpoint and perform subsequent operations in that user context.
The issue now becomes that we need to create the user fresh every time using a newly generated token. So, how can we generate the token with Postman?
Well, here’s already some bad news. Since the user needs to confirm that it is indeed him signing in, there is no way of doing it in a way that it would run using newman, so in the github run pipeline. For the runners running locally though, it is possible.

These are the values that you will need to provide:
- Token name: choose whatever name you’d like
- Callback URL: https://oauth.pstmn.io/v1/callback
- Auth URL: https://accounts.google.com/o/oauth2/auth
- Access token URL: https://accounts.google.com/o/oauth2/auth
- Client ID: XXXXXX.apps.googleusercontent.com (found in your developer console upon registration)
- Client secret: XXXXXXgsTpBtFxF (found in your developer console upon registration)
- Scope: https://www.googleapis.com/auth/userinfo.profile https://www.googleapis.com/auth/userinfo.email (or whichever scopes you’ve defined, separated by a space)
Next, press on Get New Access Token, and you will get your new token.

Once this is done, copy the value for the idtoken, and create a new, local environment for Postman. Here, you then add the
key value pair accessToken and enter the value of the idtoken.


Finally, you change the Authorization value to contain just that value, by having it defined as {{accessToken}}.

Now, after adding this authentication on all your tests, you can use your runner again locally to make all tests green (if you’ve followed along in the articles, you may need to change some tests to reflect the other changes that have been made…)
Alternative in automated suites
Great, we can now run our tests again with the local runner. However, we simply do not want to always do so. Very often, we will be confident enough that nothing is broken, or we may simply want to push our code. Yet, we’d still like to know if we broke anything. So, how can we make sure that the pipeline will also still run all the tests, without failing simply because it cannot get new OAuth tokens.
Well, I would say, we modify the OAuth lookup in that scenario. I would even argue that, even if it was working, we wouldn’t want to do an actual Google OAuth verification!
The reason for that argument is simple - we want to test our backend application, and not Google’s authentication process. We actually want to stub, or mock, any third party application, and Google is no exception there!
So, we need to add an additional IdTokenVerifier that only runs conditionally. Here is an example:
@Configuration
@ConditionalOnProperty(value = ["spring.security.type"], havingValue = "mocked")
class MockSecurityConfig {

    @Bean
    fun googleTokenVerifier(): GoogleIdTokenVerifier {
        return MockGoogleIdTokenVerifier(GooglePublicKeysManager(NetHttpTransport(), GsonFactory()))
    }

    class MockGoogleIdTokenVerifier(publicKeys: GooglePublicKeysManager? = null) :
        GoogleIdTokenVerifier(publicKeys) {

        override fun verify(idTokenString: String?): GoogleIdToken {
            idTokenString?.let {
                if (it.startsWith("0")) {
                    throw RuntimeException()
                }
            }
            val payload = GoogleIdToken.Payload()
            payload.email = "me@mail.com"
            payload["email"] = "me@mail.com"
            payload["name"] = "Cédric Mauquoi"
            payload["given_name"] = "Cédric"
            payload["family_name"] = "Mauquoi"
            return GoogleIdToken(JsonWebSignature.Header(), payload, byteArrayOf(), byteArrayOf())
        }
    }
}
There are two things to note in that Config:
- It will only be injected into the Filter if the
spring.security.typehas the valuemocked - It will return the same User from the token every request, but it will also be able to handle negative testing. For this, all you need to do is use a token that’s at least 8 characters long, with the 8th being a 0
Now, next thing is to set the Config also in the other case. For this, we add
@ConditionalOnProperty(value = ["spring.security.type"], havingValue = "real", matchIfMissing = true)Testing this out, we can delete all users from the DB, and request a login. Afterwards, let’s see if the user was added.

There you have it! I have now adapted the tests to make the entire pipeline functional again, but that doesn’t need to be
in the article. One thing I would like to mention though, is that we have now set the Authorization with the local variable
{{accessToken}}. To set that value with newman, we change the command in the github actions file slightly to
newman run src/test/resources/application-tests.json --env-var accessToken=987654329876543.
Any value not starting with 0 will do.
I hope you enjoyed it and can continue testing your code with this mocked user setup!