Previously, we’ve talked about making http calls through WebClient, and also how to test. You may remember though, that we’ve also previously set up a CI/CD automated pipeline, which would run on every push, and also merges on the main branch.
That pipeline contained a Newman script, which would run automated tests against the application running in a docker container. So far, all of this has been fine, as every call was pretty much controlled by our code.
With introducing a third party into the equation though, this may no longer be the case, as we cannot always predict the response that service will give us.
In this article, we’ll cover potential solutions and implement one of them.
Why to avoid real services in automated pipelines
Okay, this may be a bit misleading. It’s fine to use real services in automated pipelines, but only if you control the entire flow. Here are some potential issues that occur if you use the actual third party in a pipeline:
- Service could be down
- Response could change, thus breaking your assertions
- You may be charged per request
Of course, the service could also be down if you control the third party yourself, thus breaking the build. This could even be seen as a blessing though, as it will notify you that your other application is down. If the third party is not yours, however, this should not be your immediate concern.
The first two reasons would break your pipeline without it being your fault, and should therefore be avoided. The third reason is simply for monetary reasons. Imagine you pay for a service and get 100 requests per day. If your pipeline were to now use 50 of those requests, that would potentially have large consequences that you may not want to face.
Solutions
In order to handle the problems mentioned above, here are some potential solutions (and this is by no means an exclusive list):
- Stubbing the responses on your server
- Mocking the responses in your code
- Avoiding the tests
- Fancy usage of contract testing
- Using a service that serves static responses
Let’s go over these options one by one.
Stubbing
Stubbing is a very elegant solution, as it ensures that you are still making an actual HTTP request, but you will always know the answer in advance. This was very close to being the option that I would choose, however, for the current usecase of retrieving crypto prices, it seemed like overkill.
One major advantage of stubbing is that you can introduce some logic, so it could become very useful in access testing (e.g. you acn access accounts, unless they start with 0)
Mocking
Mocking is different from stubbing, in that the mocks are actually predefined inside your codebase. The reason to avoid this is because mocks are not actually proof that you are making an actual HTTP call at all.
Not testing
Okay, I inserted this as a joke, really. You’d be surprised how many people would actually chose this option…
Contract testing
There are many forms of Contract Testing. In general, it is something that is a good practice. However, just as stubbing was already determined to be overkill, contract testing falls into the same category.
Additionally, depending on which contract testing framework is used, it would actually make the real call later on, and update the response. This is not at all what we require.
Static responses
You guessed it - the option we’re going to go with in this article is the usage of static responses. Obviously, this may change in the future, but for now, it fulfills every criterion we have:
- It is easy to implement
- It is usually very stable
- It serves the same response always (obviously)
Implementation of static responses
There are several sites out there that will service static responses for free. One that I really enjoy is beeceptor, because its free plan is quite flexible, as long as you stay inside a reasonable limit. One of its main advantages is also that you can define the path, whereas other services often generate the endpoint without the option of defining the path.
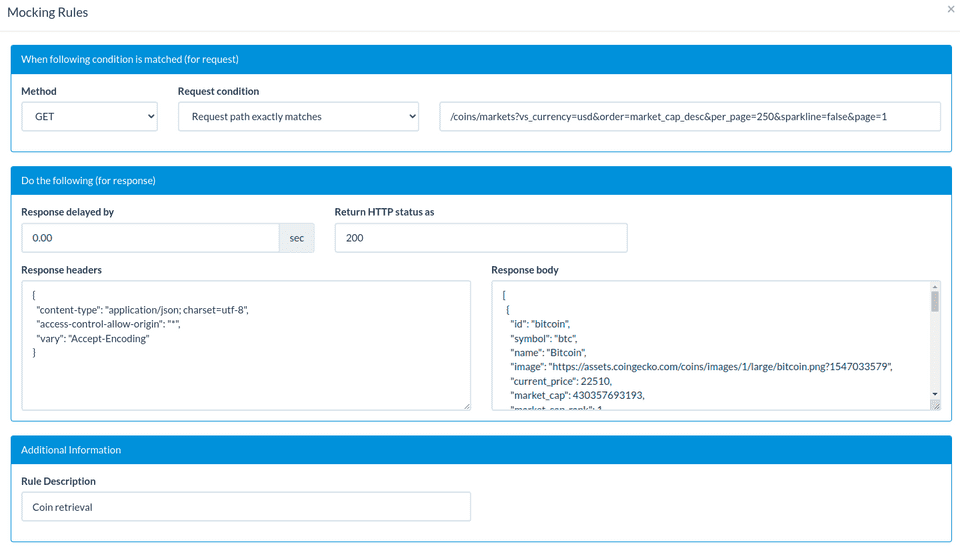
So, after creating an account on beeceptor, we can now configure our first mock. The setting I choose is the exact endpoint that
is to be called, so the url will be
https://myproject.free.beeceptor.com/coins/markets?vs_currency=usd&order=market_cap_desc&per_page=250&sparkline=false&page=1.

For the reason that I follow the exact path, I also made the amount of pages to retrieve configurable, so that it only fetches one single page, as opposed to the 8 before. Here the reason is to not exhaust the limit as quickly.
Wonderful! Now, with all that decided, let’s create the following application-test-pipeline.yaml, which contains all the
values from test profile, but with these changes:
service:
  coingecko:
    base-url: https://myproject.free.beeceptor.com/
    pages: 1
With that done, let’s run the runner in Postman first! For the purpose of this article, I’ve briefly set the values from
the application-test-pipeline.yaml into the actual application.yaml. We can now see that the entire runner exits successfully.

Of course, now we need to set the profiles in the github action profiles to spring.profiles.active=postman,test-pipeline!
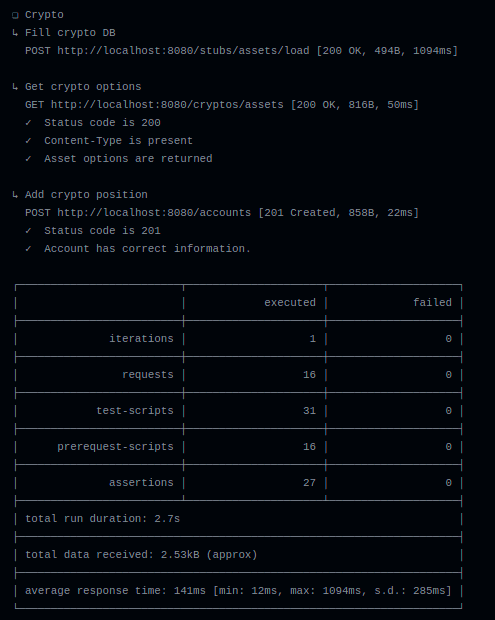
So, now we get to the final test. After pushing and waiting for Github to complete the running of the entire pipeline as an action, we get to see the following, nice statement in the logs:

There we have it! The option to stub requests, from a third party, so that we can run our newman runner successfully in our pipeline!
If you know of any better ways, do not hesitate to leave a comment below!